Organizing your bedroom starts with decluttering your jewelry collection. Embrace the charm of 20 easy DIY bracelet holder ideas to make a stunning display that keeps your bracelets neatly stored and easily accessible. Tangled bracelets are a thing of the past with these bracelet display options, ranging from rustic chic to modern elegance. These ideas are not only cost-effective but also offer the flexibility to match any decor style, ensuring your pieces are showcased beautifully and remain tangle-free.
Delving into the world of DIY bracelet holders promises both form and function for your treasured accessories. Each project is designed to offer simple solutions that enhance organization in your space. With materials you may already have on hand, these bracelet holder ideas are sure to inspire creativity and tidiness. Continue reading for a guide brimming with tips on crafting your own jewelry display, tailored to your personal style and functional needs.

Why Make Your Own DIY Bracelet Holder?
- Cost-Effective: Making your own bracelet holder can save you money compared to buying one from the store. With simple materials that are often readily available at home or can be purchased at low costs, you can craft a functional piece without breaking the bank.
- Customization: DIY projects allow you to tailor the holder to your specific needs and aesthetic preferences. Choose the colors, materials, and size that best fit your space and style.
- Organization: A bracelet holder helps to declutter your space by providing a dedicated spot for your jewelry. This prevents tangling and makes it easier to find the perfect bracelet to match your outfit.
- Accessibility: With a DIY bracelet holder, your jewelry is displayed openly, making it simple to see all your options and pick what you want to wear. No more digging through a jewelry box or drawer!
- Personal Satisfaction: There’s a unique sense of achievement and personal touch that comes with making something with your own hands. It can also be a fun activity to enjoy alone or with friends and family.
- Gift-Giving: A handmade bracelet holder can be a thoughtful and personalized gift for someone special. It shows effort and consideration, making it a memorable present.
- Eco-Friendly: By repurposing and recycling materials, you can make an eco-conscious item that helps reduce waste.
Making your own bracelet holder is not just a creative outlet; it’s a practical decision that adds beauty and functionality to your daily life. Plus, it’s an enjoyable way to spend your time and can even become a cherished hobby.
How to Make a Simple DIY Bracelet Holder
Making a DIY bracelet holder is an excellent way to keep your jewelry organized and accessible. This guide will walk you through the process of making a practical and stylish bracelet holder using materials you may already have at home. Let’s get started!
Materials Needed:
- 1 paper towel roll or a sturdy cardboard tube
- Decorative fabric or colored duct tape
- Scissors
- Hot glue gun with glue sticks- A base such as a CD or a small wooden plaque
- Spray (optional, base)
Instructions
Step 1: Prepare the Base
- If using CD holder, you may wish to give it a fresh coat of paint. Simply spray paint it in a well-vent area and let it dry completely.
- If using a wooden plaque, you can either paint it or leave it as is for a rustic look.
Step 2: Cover the Roll
- Measure cut your fabric to wrap around the paper towel roll. Leave some extra fabric on the ends to tuck in.
- If using duct tape, simply wrap it around the roll, overlapping slightly to ensure the entire surface is covered.
Step 3: Secure the Fabric or Tape
- For fabric: Apply a line of hot glue along the edge of the fabric and secure it to the roll. Roll the fabric around the tube, adding glue as needed. Tuck the excess fabric into the ends of the roll and glue in place.
- For duct tape: Start at one end of the roll and wrap the tape around, smoothing out any bubbles as you go.
Step 4: Attach the Roll to the Base
- Cut a small slit in the center of the roll if it doesn’t already fit onto your base. The slit should be just wide enough for a snug fit.
- Apply a generous amount of hot glue to the top of the base or CD holder and quickly place the roll onto it. Hold in place until the glue sets.
Step 5: Add Finishing Touches
- Once the glue is dry, you can add any additional decorations, such as ribbons or stickers, to personalize your bracelet holder.
Tips for Success:
- Highlight: Always let paint and glue dry completely before moving on to the next step to ensure a clean and professional finish.
- Be Creative: Don’t be afraid to use a mix of fabrics or patterns for a unique look.
- Stability: Make sure the base is heavy enough to support the weight of the bracelets. Add some weight, like stones or sand, if necessary.
- Careful with the Glue Gun: Hot glue can be very hot and cause burns, so handle it with care.
By following these simple steps, you’ll have a beautiful and functional DIY bracelet holder in no time. This project is not only cost-effective but also allows you to express your creativity and personalize your jewelry storage. Enjoy your crafting!
FAQS: DIY Bracelet Holder Ideas
Discover creative and practical DIY bracelet holder ideas. Get inspired and learn how to organize your bracelets with these helpful tips and tricks.
What materials do I need to make a simple DIY bracelet holder?
To make a basic DIY bracelet holder, you typically need:
- A sturdy cardboard tube or a paint roller cover
- Fabric or decorative duct tape
- Hot glue gun with glue sticks
- Scissors
- A base such as a CD or small wooden plaque
- Spray paint or acrylic paint (optional for the base)
How can I ensure my DIY bracelet holder is stable?
To ensure stability:
- Choose a heavy base that can support the weight of the bracelets.
- Consider adding weight to the base, like stones or sand, if necessary.
- Use a generous amount of hot glue to secure the roll to the base and allow it to dry completely.
Can I make a bracelet holder that doubles as room decor?
Yes, many DIY bracelet holder designs can double as room decor. Use materials that match your room’s aesthetic, and consider adding decorative elements like ribbons, stickers, or paint to personalize your bracelet holder.
Are there any eco-friendly options for making a bracelet holder?
For an eco-friendly bracelet holder, consider:
- Repurposing materials like soda crates, glass bottles, or old candle holders.
- Using recycled materials like cardboard rolls and scrap fabric.
- Avoiding the use of plastics and opting for natural materials.
How can I customize my DIY bracelet holder?
To customize your bracelet holder:
- Choose fabrics or paint in colors that match your style or room decor.
- Add decorative accents like lace, beads, or washi tape.
- Use different base shapes or designs for a unique touch.
Is it possible to make a bracelet holder without using a hot glue gun?
Yes, you can make a bracelet holder without a hot glue gun by:
- Using strong adhesive tape or double-sided tape to secure materials.
- Employing other types of glue that have a strong bond, such as E6000 or wood glue.
- Utilizing friction or tension-based designs that hold components together.
Can I make a bracelet holder that can also store watches and necklaces?
Absolutely! To accommodate watches and necklaces:
- Ensure your design includes longer arms or taller stands.
- Use multiple levels or add hooks to hang necklaces.
- Design wider spacing between arms to fit watches comfortably.
What’s the easiest way to make a bracelet holder for a beginner?
For beginners, the easiest way to make a bracelet holder is to:
- Start with a simple design like a covered cardboard tube on a base.
- Use materials that are easy to work with, such as fabric or duct tape.
- Follow a step-by-step tutorial for guidance.
Can I make a bracelet holder that is portable for travel?
Yes, to make a portable bracelet holder:
- Opt for lightweight materials like foam or fabric.
- Design the holder to be collapsible or roll-up.
- Ensure it is compact and can fit into your luggage or carry-on.
How do I protect my bracelets while they’re on the holder?
To protect your bracelets:
- Avoid overcrowding the holder to prevent scratching.
- Use soft materials like felt or velvet to cover surfaces.
- Keep the holder in a dry place away from direct sunlight to prevent tarnishing.
DIY Bracelet Holder Ideas
Discover creative and practical DIY bracelet holder ideas to keep your favorite accessories organized and easily accessible. Find inspiration for stylish and functional displays that will add charm to your space.
1. DIY Bracelet Display Stand
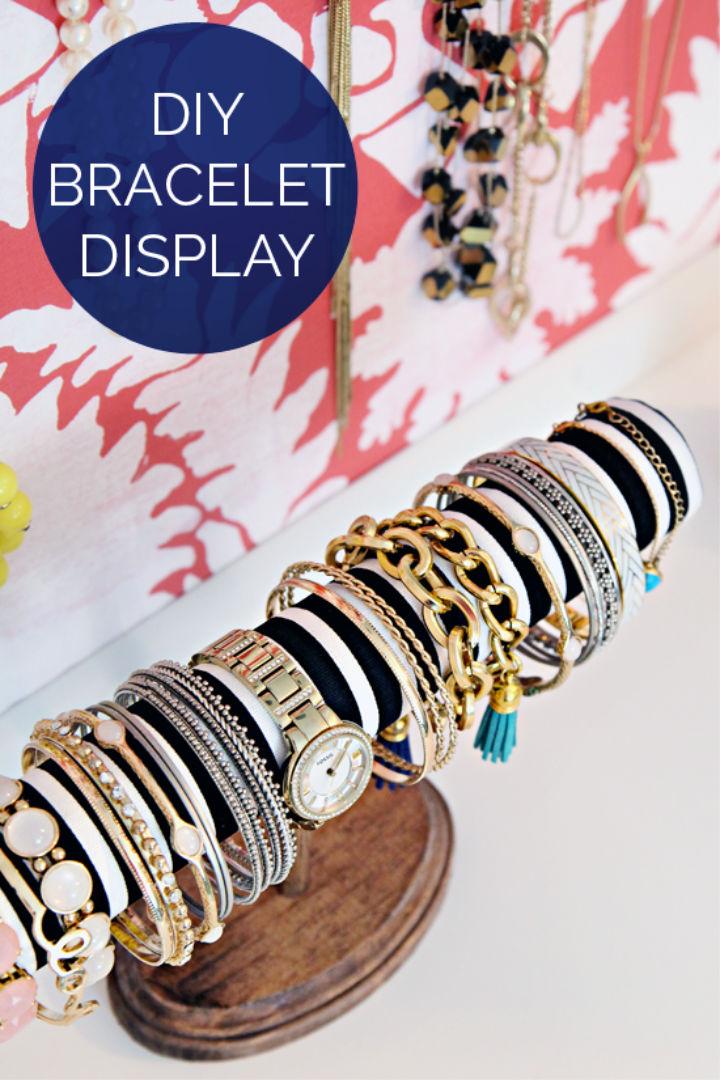
Make a charming and practical bracelet display with this simple DIY project. By repurposing a paper towel roll and utilizing a few inexpensive supplies, you can organize your bracelets in style. The process involves staining a wooden plaque and dowel, wrapping the roll in fabric, and assembling the pieces with wood glue and hot glue for stability.
This craft not only adds a personal touch to your dresser but also makes it easy to see and choose your accessories each day. Perfect for jewelry lovers, this $2 DIY bracelet display is an efficient and attractive solution to keep your favorite pieces within reach. Iheart Organizing
2. How to Make a Marble Cone Bracelet Holder
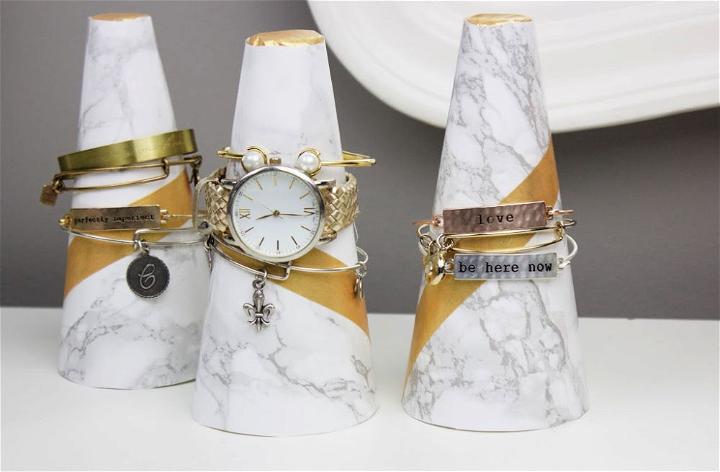
Organize your bracelets in style with a chic DIY Marble Cone Bracelet Holder, a creative solution to keep your jewelry in plain sight for easy access. A Little Craft In Your Day offers a simple, step-by-step guide to craft these trendy accessories using FloraCraft® Make It: Fun® Foam Cones, marble contact paper, and gold washi tape.
The process involves wrapping the cones in the marble paper, trimming the excess, and accentuating with gold tape for a touch of elegance. Perfect for displaying your bracelets, these holders are a blend of functionality and modern design, all while being budget-friendly. With clear instructions, this craft is accessible and can elevate your space with a personalized touch.
3. Make Your Own Bracelet Tower
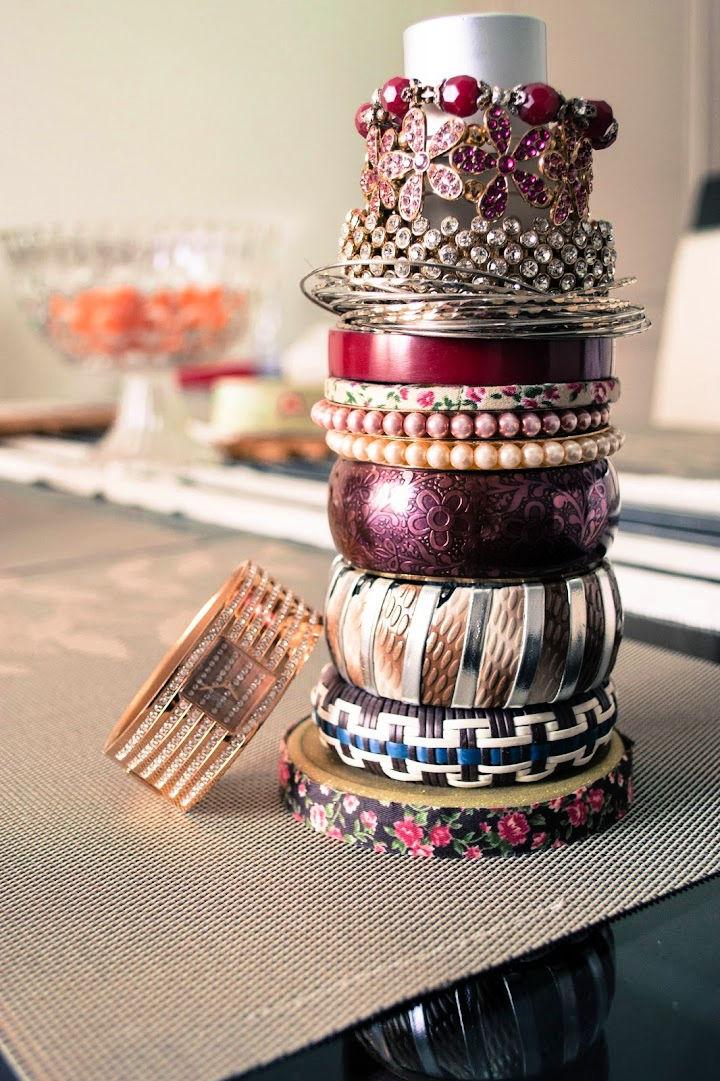
Craft A Doodle Doo presents a nifty DIY Bracelet Tower tutorial that’s both stylish and functional. If your bracelets are cluttering up your space, this guide offers a simple solution to organize them beautifully. With a few easy-to-find supplies like a Krylon Glitter spray, an empty fragrance bottle, and a sturdy lid, you can make a chic storage display for your vanity. The instructions are clear and easy to follow, ensuring a quick and satisfying project. A hot glue gun is a tool required to assemble your new bracelet holder. Get ready to transform your bangle chaos into a masterpiece of organization.
4. Making a Cuff Bracelet Holder
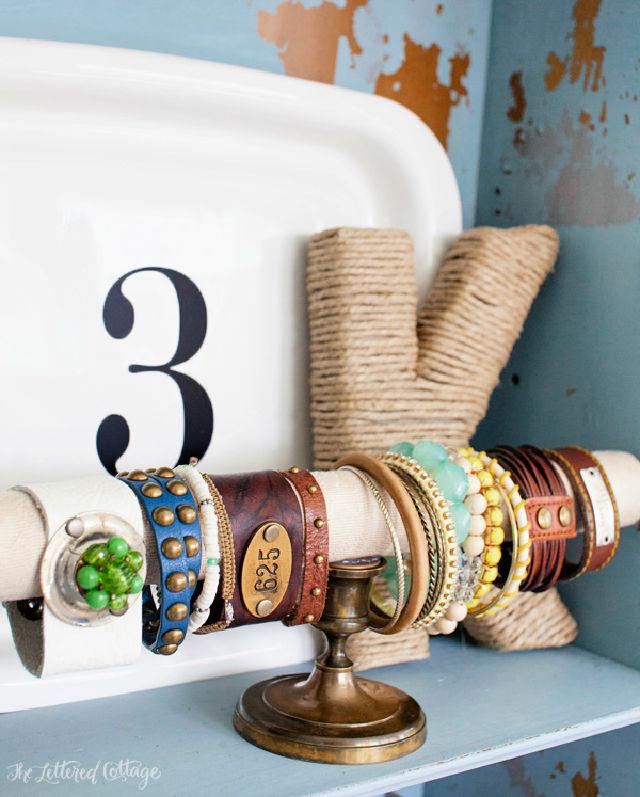
Make your own cuff bracelet holder with inspiration from The Lettered Cottage‘s DIY guide. Layla shares a heartfelt story intertwined with a crafty project that not only serves as a functional piece for organizing jewelry but also carries sentimental value, having been a thoughtful gift from her mother.
The holder is ingeniously made from simple materials like a cardboard tube, fabric, and an old candle holder, proving that creativity can transform everyday items into cherished keepsakes. Dive into the details of how to craft this personalized accessory stand, perfect for keeping your favorite bracelets within easy reach while adding a touch of homemade charm to your decor.
5. Handmade Bracelet Holder
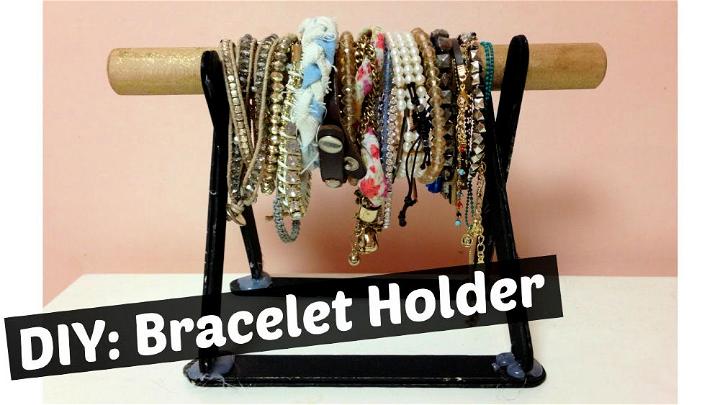
Transform your jewelry storage with a handmade bracelet holder using this engaging DIY tutorial from YouTube. In a few simple steps, you can make a functional and stylish organizer that not only declutters your space but also adds a personal touch to your decor. The video guides you through the process, from selecting materials like popsicle sticks and a wooden rod to assembling and customizing your bracelet holder with your choice of colors.
Ideal for crafters who enjoy practical projects, this easy-to-follow guide ensures your bracelets are neatly displayed and always within reach. Dive into this craft and give your accessories the home they deserve while enhancing your room’s aesthetic appeal.
6. DIY Bracelet Display from Recycled Materials
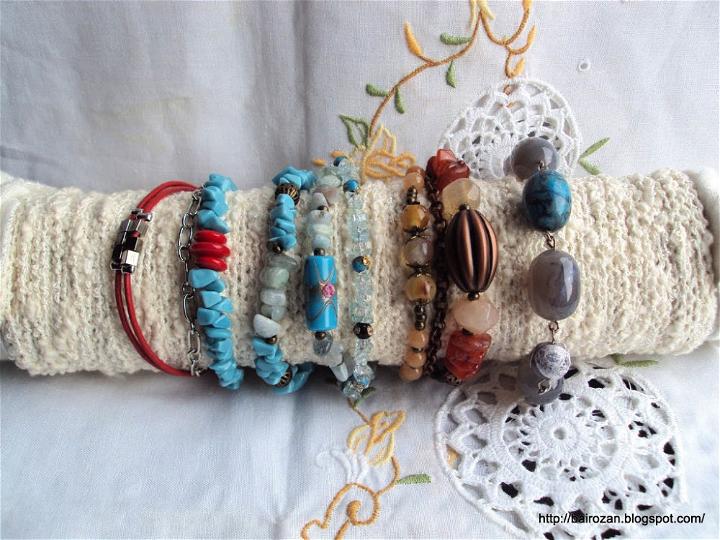
Craft a unique bracelet display using recycled materials with this engaging DIY project from Cut Out + Keep. Transform packaging leftovers into a chic organizer for your jewelry with a simple and eco-friendly approach. By repurposing a polystyrene sheet and polyethylene insulation, along with some thrifted yarn, you can make a stylish and functional display for your bracelets.
This project not only helps reduce waste but also adds a personal touch to your space. It’s a clever way to showcase your bracelets while practicing sustainability. Perfect for crafters who enjoy upcycling, this tutorial is both instructive and rewarding.
7. Make a Wooden Bracelet Holder
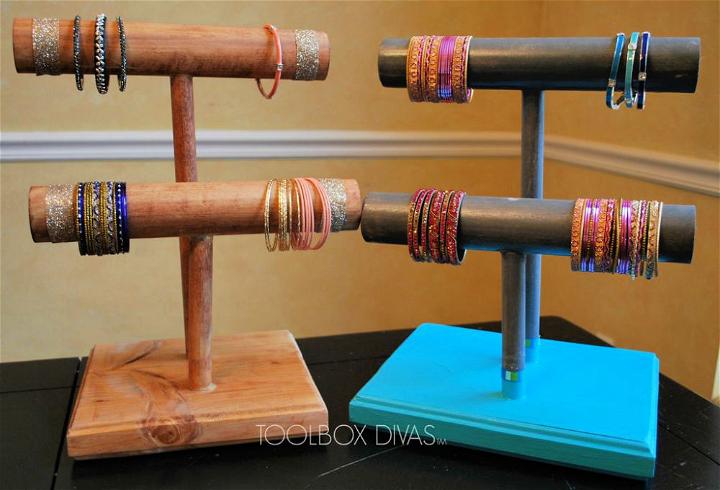
Make your own wooden bracelet holders with this instructive guide from Instructables. Ideal for organizing jewelry and adding a touch of decor to your bedroom, these DIY holders are both functional and stylish. The tutorial is easy to follow, ensuring you can craft a piece perfect for displaying your favorite bracelets. With clear steps and helpful tips, you’ll have a charming and practical jewelry storage solution in no time. Perfect for anyone looking to tidy up their space and showcase their jewelry collection, this project is sure to enhance your home’s aesthetics.
8. Easy DIY Bracelet Display Holder
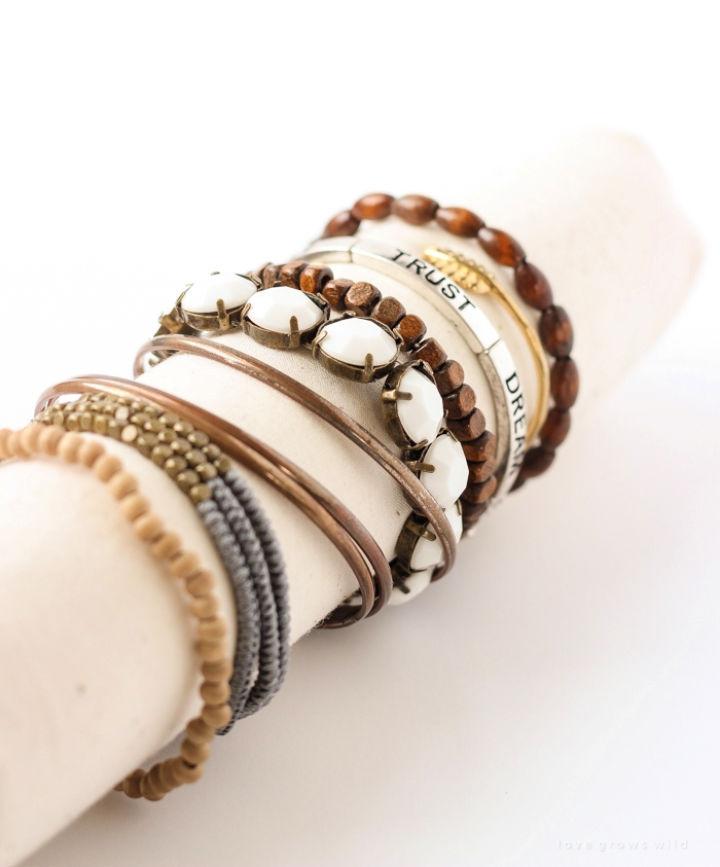
Organize your bracelets in style with a handmade bracelet holder from Love Grows Wild. In this easy-to-follow DIY project, you only need four supplies: fabric, a paint roller cover or sturdy cardboard tube, a hot glue gun, and scissors. Start by cutting the fabric to size, then make a hem using hot glue for a polished look. Attach the fabric to the roller, roll it tightly, and tuck the ends in, securing them with glue.
This quick and efficient craft not only helps declutter your space but also turns your jewelry into a display piece. Perfect for adding a personal touch to your dresser or vanity, this DIY bracelet holder will keep your accessories organized and within reach.
9. Homemade Necklace and Bracelet Holder
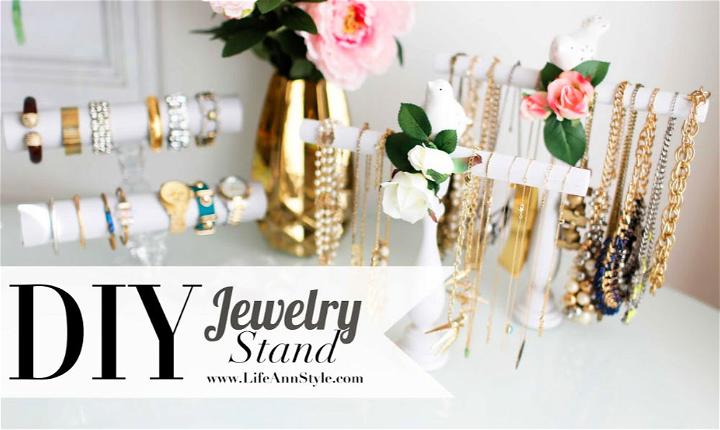
Struggling with tangled necklaces and bracelets? Ann Le’s DIY Necklace & Bracelet Holder tutorial on YouTube is your perfect solution for keeping your jewelry organized and accessible. In this easy-to-follow video, Ann guides you through making two homemade jewelry holder designs using affordable materials you might already have at home. Not only do these holders prevent your favorite accessories from knotting up, but they also double as chic room decor.
Whether you prefer a spring-inspired look or a more minimalist approach, Ann’s step-by-step instructions make crafting these holders a breeze. Tune in to transform your jewelry storage and add a personal touch to your space. Remember to visit YouTube and search for Ann Le’s channel for this creative and functional DIY project.
10. How to Make a Bracelet Holder
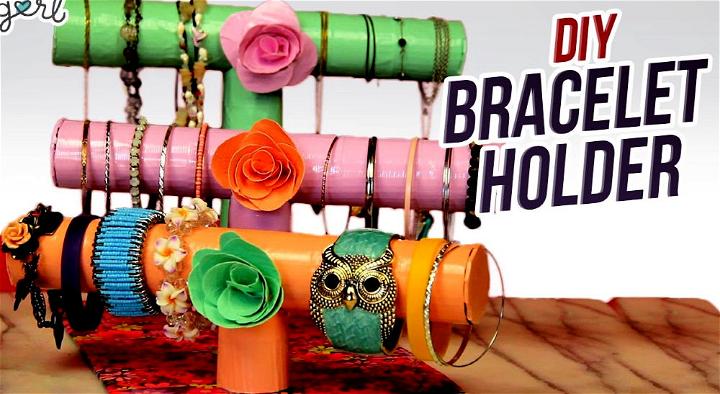
Struggling with tangled bracelets and misplaced jewelry? Gurl.com presents an engaging and informative DIY tutorial that guides you through making a stylish and functional bracelet and jewelry holder. This step-by-step video makes organizing your accessories a breeze, keeping them neat, visible, and ready to wear. With a list of simple supplies like paper towel rolls, cardboard, and decorative materials, you’ll transform everyday items into a chic display for your treasured pieces.
Perfect for anyone looking to tidy up their space and add a personal touch to their decor, this DIY project is both practical and enjoyable. Tune in to learn how to craft a jewelry holder that not only prevents damage but also showcases your collection beautifully.
11. Simple DIY Little Bracelet Display Stand
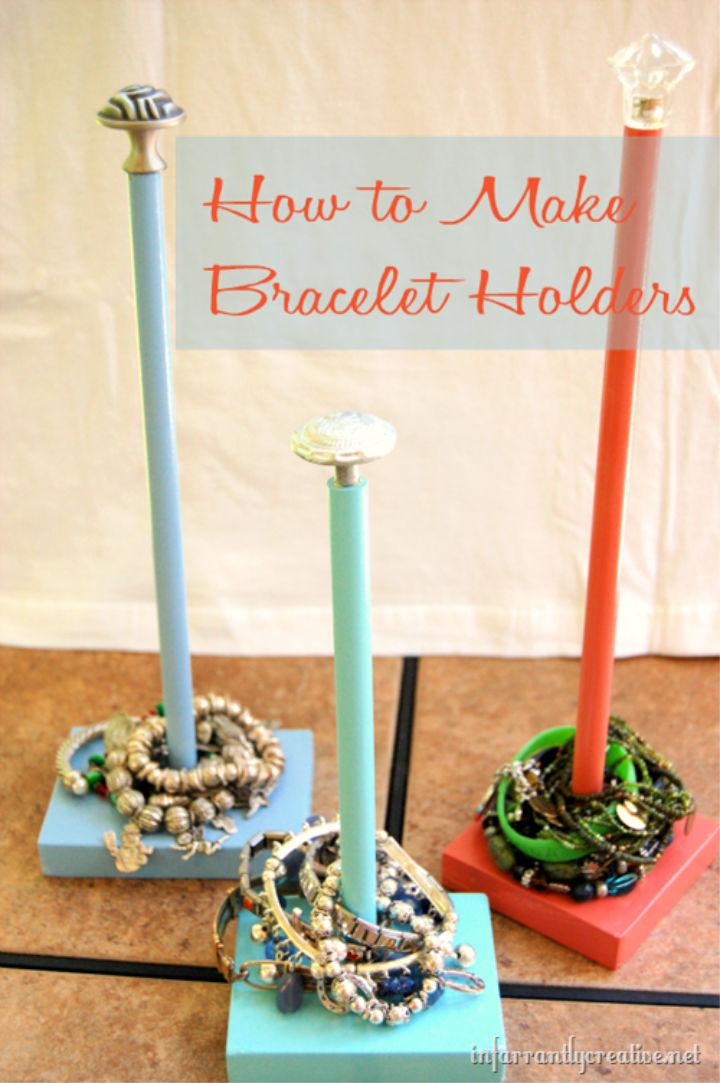
Transform old playpen spindles into charming bracelet display stands with Infarrantly Creative‘s step-by-step guide. This DIY project is perfect for crafters who enjoy repurposing materials to make functional, stylish organizers. Gather dowel rods, paint, wood scraps, and a few tools to assemble these custom bracelet holders.
The tutorial is straightforward, offering a creative solution for showcasing your bracelets. By following the clear instructions, you can make a unique accessory for your dresser or vanity that not only organizes your jewelry but also adds a personal touch to your decor. Keep your bracelets neatly displayed and within easy reach with this inventive craft.
12. DIY Soda Crate Bracelet Holder
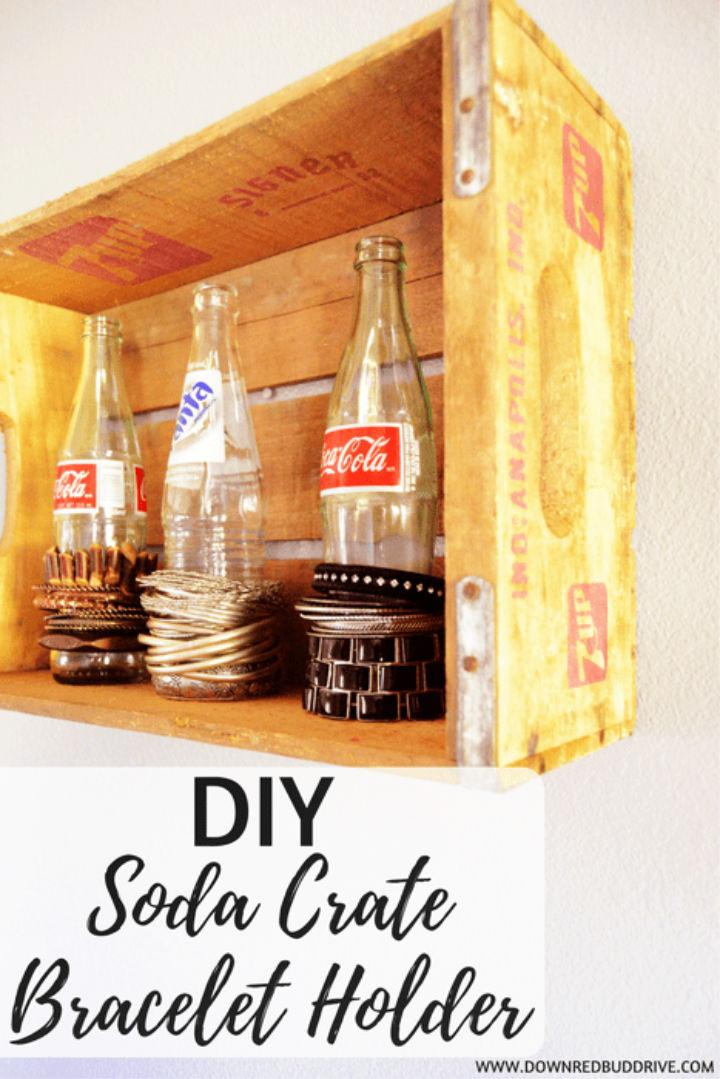
Transform your bracelet storage with a charming DIY Soda Crate Bracelet Holder from Down Redbud Drive. This creative project repurposes an old wooden soda crate and glass bottles into a stylish and functional jewelry display. Ideal for keeping your bracelets organized and easily accessible, this craft is simple to make without any drilling required. By using E6000 epoxy, you can securely attach the bottles to the crate, making perfect rods for your bracelets.
After a 24-hour drying period, your new bracelet holder is ready to enhance your vanity or can be mounted on the wall for a unique touch. This project is not only a smart solution for your own accessories but also makes for an excellent, personalized gift for any special occasion.
13. Bracelet Holder Or Jewelry Organizer
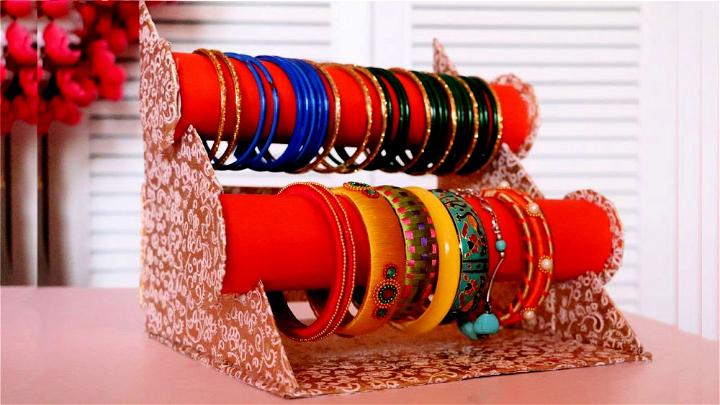
Dive into the world of crafting with Little Crafties’ DIY Bangle Stand tutorial on YouTube. This engaging video guides viewers through the process of making a chic and functional bracelet holder using everyday materials like cardboard and paper rolls. Ideal for jewelry enthusiasts seeking a homemade storage solution, this project not only recycles but also adds a touch of elegance to your space.
The step-by-step instructions are easy to follow, making it a perfect activity for a crafty afternoon. Plus, with its budget-friendly approach, it’s an excellent choice for those wanting to organize their jewelry without breaking the bank. Tune in and craft your way to a beautiful and organized display for your bangles and bracelets.
14. Dollar Tree Wooden Bracelet Holder Tutorial
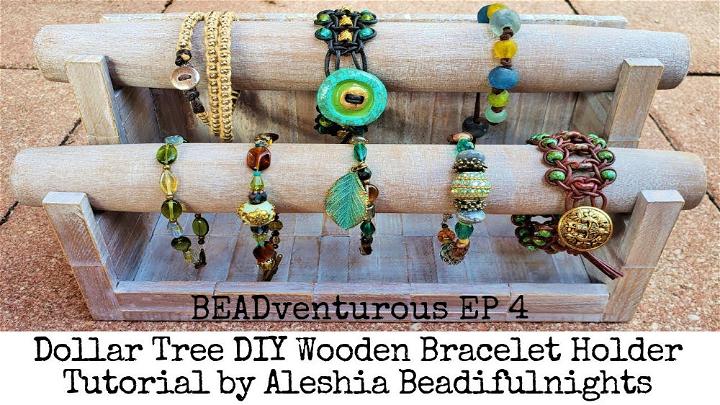
Ready to craft a unique and functional piece for your jewelry collection? Join Beadifulnights on YouTube for an engaging Dollar Tree DIY Wooden Bracelet Holder Tutorial. In this episode of BEADventurous, discover how to transform affordable materials into a chic and sturdy bracelet holder. With clear, step-by-step instructions, you’ll learn to use tumbling tower blocks and wooden rolling pins to make a display that not only organizes your bracelets but also adds a touch of rustic charm to your decor.
Perfect for crafters looking to elevate their jewelry storage solutions, this tutorial is sure to inspire your next DIY project. Get ready to make something beautiful and practical with Beadifulnights!
15. Homemade Bracelet Stand
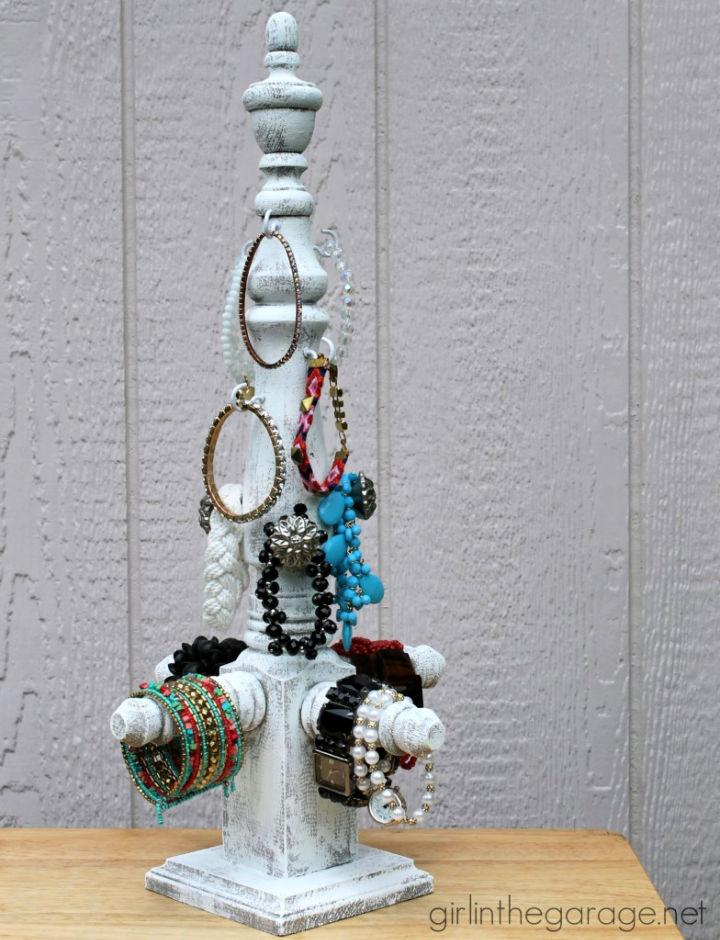
Looking to organize your bracelets and watches with a touch of DIY charm? Girl in the Garage® reveals an inventive way to make a bracelet stand using unexpected items from Lowe’s. Jen guides you through each step, from selecting wooden table legs to adding decorative hooks, ensuring your jewelry storage is both functional and stylish.
With clear instructions and creative use of materials, you’ll be inspired to tackle this project and enjoy a clutter-free space for your accessories. Paint it to match your decor and enjoy the added bonus of room for more bracelets—perfect for those who love a little extra sparkle in their lives.
16. Hair Tie Bracelet Holder
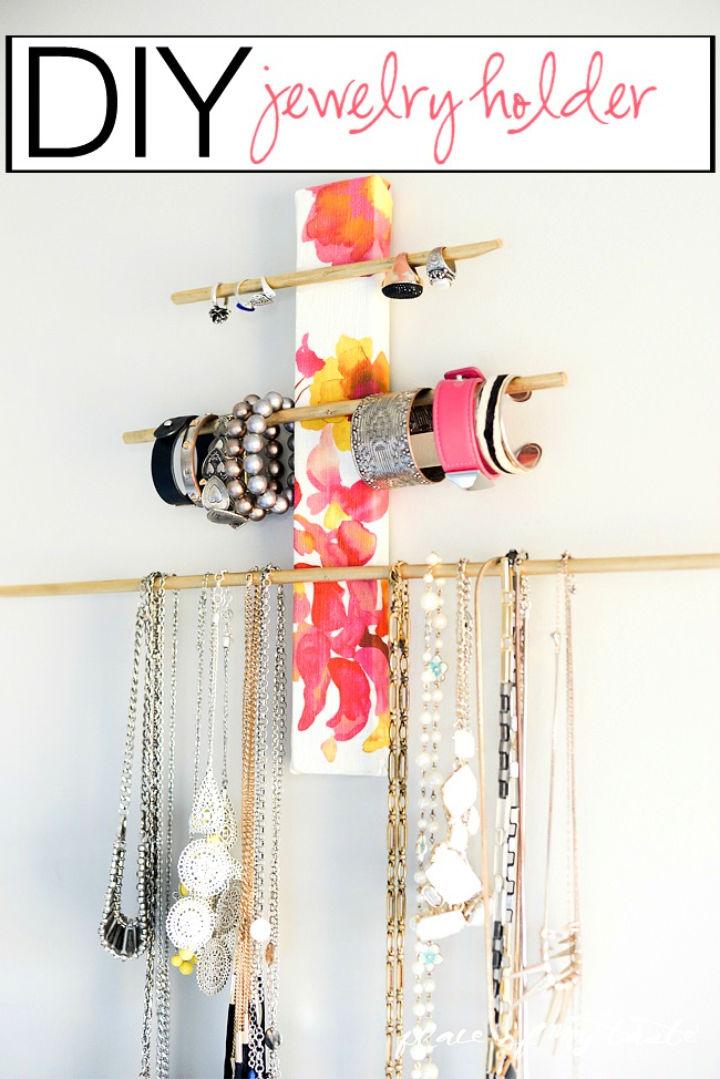
Make a chic and functional DIY jewelry holder with this engaging guide from Place Of My Taste. Perfect for organizing your necklaces, bracelets, and rings, this project transforms a simple 2×4 wood panel and some fabric into a stylish addition to your bedroom wall. With easy-to-follow instructions, you’ll need basic materials like metallic gold spray paint, wood rods, nails, and a sawtooth hanger. Secure your jewelry neatly and add a contemporary touch to your space. Get ready to tackle this craft and enjoy a clutter-free jewelry collection!
17. How to Make a Bracelet Holder at Home
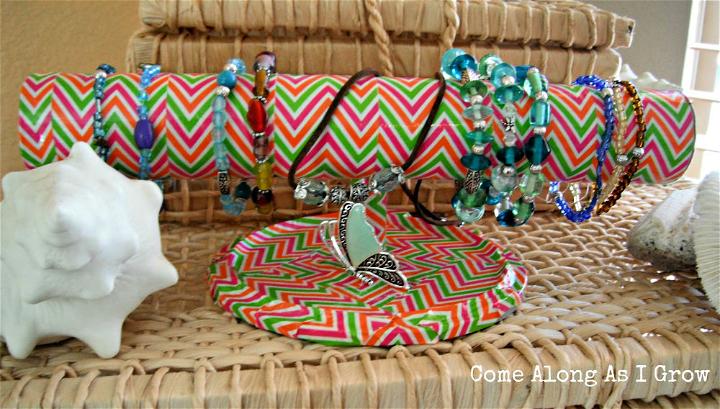
Make your own bracelet holder with this simple DIY project that transforms everyday items into a stylish organizer. All you need is a CD holder, a paper towel roll, scissors, and some vibrant duct tape. Begin by making a hole in the center of the paper towel roll, ensuring it’s wide enough to fit onto the CD holder.
Next, cover the roll with duct tape for a splash of color, re-poke the hole if it gets covered, and optionally, you can also decorate the CD holder with tape. Finally, assemble the pieces, placing the roll onto the CD holder. Now you have a unique and functional bracelet holder to keep your jewelry neatly displayed and within reach. This easy-to-follow craft is perfect for anyone wanting to organize their accessories in a personalized way. comealongasigrow
18. Paper Towel Roll Bracelet Holder
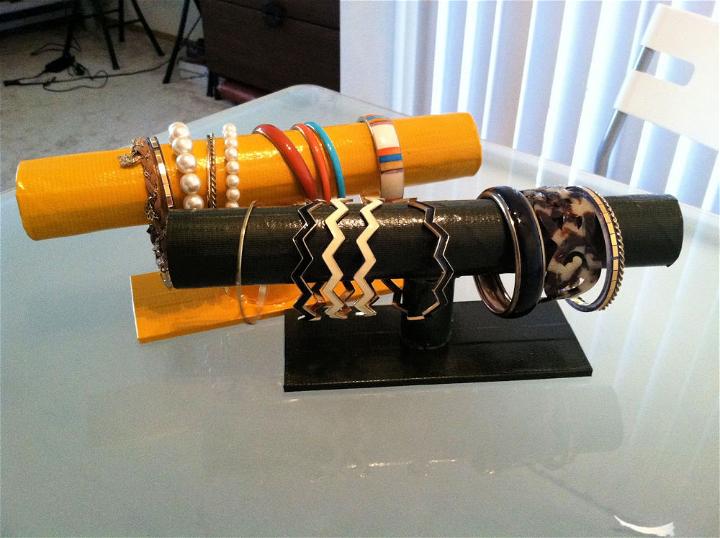
Make a stylish and functional bracelet holder with this easy DIY guide. If you’ve stumbled upon pricey suede bracelet holders and felt they were too expensive, this project is perfect for you. With a few simple materials like a hot glue gun, paper towel rolls, spray paint or colored duct tape, and wooden stands, you can craft a personalized accessory organizer.
Start by covering your materials with duct tape or spray paint, ensuring a smooth application and letting it dry thoroughly. Assemble by carefully gluing each piece together, then let it set. In no time, you’ll have a chic bracelet holder to display your favorite pieces. Crafting at home can be both rewarding and economical, and with this tutorial, you can add a touch of handmade charm to your decor. Caaarolineilee
19. DIY Cardboard Box Bracelet Storage
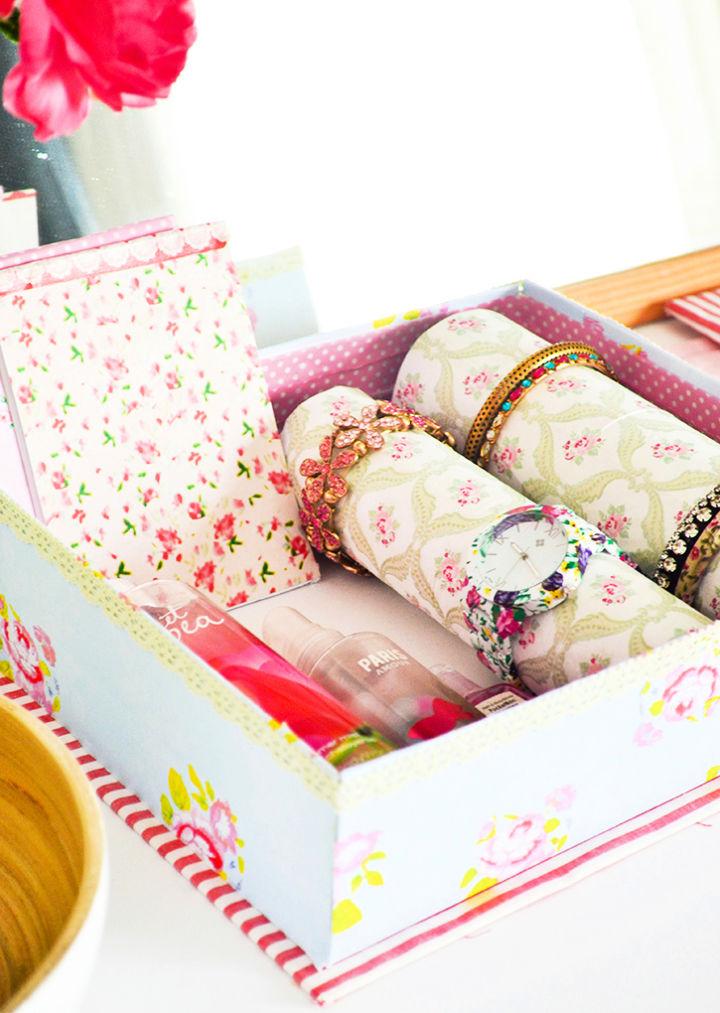
Craft A Doodle Doo presents an inventive DIY guide for organizing your bracelets and watches with style. Transform a simple cardboard box into a charming storage solution by following this step-by-step tutorial. Utilize everyday items like toilet paper tubes and scrapbooking paper to make a customized bracelet holder that complements your vanity space.
The project offers the flexibility to remove or rearrange the rolls thanks to the clever use of Velcro. Perfect for keeping your arm candy in check, this DIY endeavor not only adds a decorative touch but also simplifies your accessory selection process. Dive into this crafty adventure and give your jewelry a lovely new home.
20. Functional and Stylish DIY Bracelet Holder
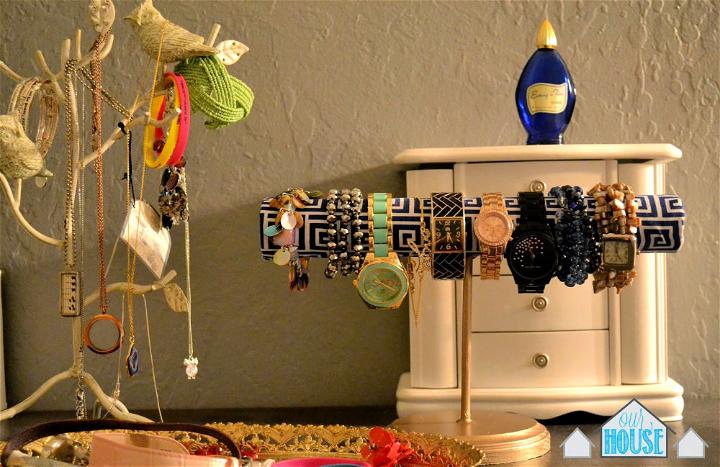
Make a functional and stylish bracelet holder with ease using this DIY guide. Perfect for organizing your watch collection or displaying your favorite bangles, this project is both affordable and simple, requiring only a few materials that are likely already in your home. Start by preparing a wooden dowel and base, then coat them with a layer of primer, followed by your chosen paint color.
While that dries, wrap a sturdy tube—like a paper towel roll—with a chic fabric using Mod Podge for a sleek finish. Assemble the pieces, securing the tube to the base, and voilà! Your personalized bracelet display is ready to enhance your dresser and keep your jewelry neatly organized. Rogstadhouse
Conclusion:
In conclusion, making a DIY bracelet holder is an innovative and enjoyable way to display your cherished accessories while keeping them organized. With these 20 easy DIY bracelet holder ideas, you can find inspiration to craft a personalized piece that not only enhances your space but also caters to your organizational needs. Dive into the world of DIY and transform how you store your bracelets, adding both function and flair to your bedroom. Happy crafting!
