Looking to organize your shoe collection in a stylish yet functional way? Our guide on 15 free DIY shoe cubby plans is here to help. Whether your hallway is cluttered with shoes or you simply desire a more organized closet, these step-by-step DIY cubby plans are tailored to suit your needs. This guide offers a range of designs, from simple to more intricate, ensuring that you find the perfect solution for your space.
Building your own shoe cubby not only allows you to customize the size and aesthetics to match your home decor but also provides a sense of accomplishment. Armed with free printable plans and a list of materials, even those with basic woodworking skills can embark on this project. Continue reading to learn how to build a shoe cubby that meets your storage needs while adding charm to your home.
Why Choose DIY Shoe Cubby Plans?
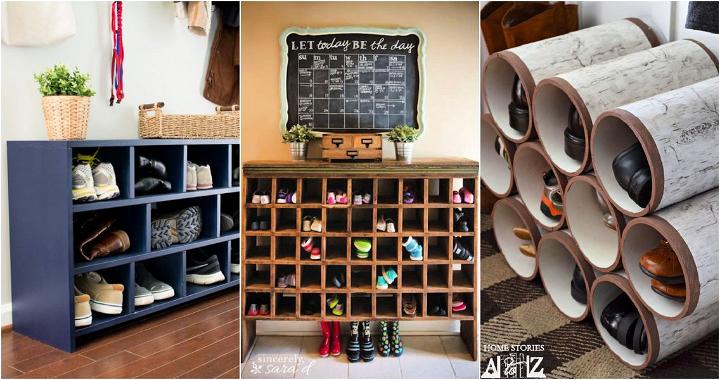
There are several reasons why you might want to consider building your own shoe cubbies using free DIY plans:
- Cost-Effective: Building your own shoe cubby can be a cost-effective solution. You can save money by using materials you already have or by sourcing inexpensive materials.
- Customizable: DIY plans allow you to customize the size, design, and color of your shoe cubby to match your home decor and personal style.
- Organized Space: Shoe cubbies help keep your footwear organized and easy to find. No more searching for that one missing shoe!
- Skill Building: Building your own shoe cubby can be a great way to learn new skills or improve existing ones. It’s a practical project that can give you a sense of accomplishment.
- Quality Time: This can be a fun project to do with family or friends. It’s a great way to spend quality time together while building something useful for your home.
Remember, the key to a successful DIY project is to plan ahead, take your time, and don’t be afraid to ask for help if you need it. Happy building!
How to Build Shoe Cubbies: Free Printable Plans
If you’re tired of tripping over shoes in your entryway or struggling to find a matching pair, building your own shoe cubby can be a game-changer. Whether you have a spacious foyer or a cozy apartment, a shoe cubby provides organized storage and keeps your footwear accessible. Let’s dive into the details with these free printable plans for building your very own shoe cubby.
Materials Needed
Before we get started, gather the following materials:
- Pine (for the main structure)
- Kreg Jig K4 (for pocket holes)
- 1 1/4 inch Kreg screws
- Radial arm saw (or any saw for cutting)
- Measuring tape and pencil
- 150- and 220-grit sandpaper
- Nail gun
- Durham’s Rock Hard Water Putty
- Rubber mallet
- HomeRight Finish Max Fine Finish paint sprayer
- Primer and paint (I used Sherwin-Williams Anchors Aweigh)
Step-by-Step Guide
Follow these steps to build your shoe cubby:
1. Cut & Polish
- Download the full build plan here.
- After cutting the pieces, smooth out rough edges with fine-grit sandpaper.
2. Attach the Sides to the Top
- Prop up the side pieces and place the top on them.
- Mark where you need to drill pocket holes on the inside of the sides.
- Use your Kreg Jig to drill three pocket holes on each piece.
- Screw the side pieces into the bottom of the top piece.
3. Drill Pocket Holes for Shelves
- Drill pocket holes on the sides of each of the three shelves.
- Place the holes on the bottom of each shelf to keep them hidden when assembled.
4. Attach the Shelves
- Flip the assembled piece upside down.
- Attach each shelf by drilling through the pocket holes directly into the sides.
- Use two divider pieces to hold the shelf up while attaching everything.
5. Nail Dividers into Place
- Slide each of the eight dividers roughly into place.
- Secure them with nails to build individual cubbies.
With your new shoe cubby, you’ll have a designated spot for every pair of shoes. Say goodbye to clutter and hello to organized bliss! Remember to follow safety precautions while working with tools and materials. Happy building! 🛠️👞
Creative Variations for Your Shoe Cubby
- Shoe Cubby Bench: Expand the functionality of your shoe cubby by incorporating a bench seat on top. This provides a convenient spot to put on or take off your shoes. Simply build a sturdy top panel and add cushioning and upholstery for comfort.
- Angled Cubbies: Create a visually interesting cubby by angling the shelves. This slanted design is great for showcasing heels or boots. Be sure to adjust your shelf measurements to accommodate this style.
- Hidden Storage: For a sleek, modern look, build cubbies with doors. This offers discreet storage, keeping shoes organized and out of sight.
- Under-Stairs Cubbies: Maximize storage potential by utilizing the often-neglected space underneath a staircase. Custom-build cubbies to fit the triangular shape of this area for smart and efficient shoe storage.
- Repurposed Crates: Do you want a quick and budget-friendly solution? Repurpose wooden crates as individual shoe cubbies. Paint or stain them to match your style, and stack them creatively for unique storage.
Additional Tips and Troubleshooting for Building DIY Shoe Cubbies
Build on a DIY shoe cubby project can transform your space and help keep your shoes organized. Here, we provide some additional tips and answer common questions to ensure your project is successful and fulfilling.
Selecting the Right Materials
- Choose wood wisely: Opt for sturdy woods like pine or birch for durability. If budget is a concern, consider MDF for painted projects.
- Consider the finish: If you’re planning to paint your cubby, primer is essential for a smooth finish. For a natural look, choose a wood stain and sealant.
Tools and Measurements
- Accuracy is key: Double-check your measurements before cutting to avoid waste and ensure a perfect fit.
- Tool maintenance: Keep your tools in good condition. Dull blades or improper tool adjustment can lead to inaccurate cuts.
Assembly and Customization
- Pre-drill holes: To prevent wood from splitting, pre-drill holes before inserting screws, especially near the edges of the wood.
- Customizing size: Adjust the cubby dimensions based on your available space and the number of shoes you need to store. Remember, it’s easier to scale down a plan than to enlarge it.
Finishing Touches
- Sanding: Smooth edges with sandpaper to prepare for painting or staining. Start with a coarser grit and finish with a fine grit for a smooth surface.
- Painting or staining: Apply thin, even coats. Allow sufficient drying time between coats for the best finish.
Troubleshooting Common Issues
- Wobbly structure: Check if all screws are tightened and if there’s a need for additional support brackets.
- Paint not adhering: Ensure the wood is clean and properly sanded before applying primer. Some woods may require a specific type of primer.
- Gaps or misalignment: Use wood filler to correct minor gaps. For misalignments, double-check if pieces were cut to correct measurements and angles.
Frequently Asked Questions
- Can I add doors to my shoe cubby? Yes, adding doors can create a sleek look and keep dust away. Measure carefully and consider adding soft-close hinges for a touch of luxury.
- Is it cheaper to build or buy a shoe cubby? Generally, building your own can be more cost-effective, especially if you have some materials and tools on hand. Plus, it allows for customization.
- How do I make my shoe cubby waterproof? For areas prone to dampness, consider using a waterproof sealant or choosing materials like cedar that naturally resist moisture.
- Can this project be completed by a beginner? Absolutely. Start with a simpler design and don’t hesitate to ask for help or watch tutorial videos for techniques you’re unfamiliar with.
DIY Shoe Cubby FAQs
Building your own shoe cubby can be a rewarding project. Here, we’ve compiled some frequently asked questions to help guide you through the process.
How do I customize the size of my shoe cubby?
To customize your shoe cubby:
- Determine the space where you want to place the cubby and measure the height, width, and depth.
- Decide on how many pairs of shoes you want to store.
- Plan the dimensions of each cubby based on the size of the shoes.
- Adjust the overall dimensions of your shoe cubby plan accordingly.
Can I build a shoe cubby if I have limited woodworking skills?
Yes, you can! Choose a simple design with straightforward construction methods. Projects that use basic tools and have detailed instructions are perfect for beginners. Remember, practice makes perfect, and starting with a DIY shoe cubby can help you improve your woodworking skills.
How can I make my shoe cubby more durable?
To ensure durability:
- Use high-quality, sturdy wood.
- Apply a primer before painting to protect the wood.
- Use wood glue in conjunction with screws for a stronger bond.
- Apply a finish or sealant to protect the paint and wood from wear and tear.
Is it cheaper to build or buy a shoe cubby?
Building your own shoe cubby can be more cost-effective than buying one, especially if you already have some of the necessary tools and materials. DIY allows you to customize the size and design, potentially saving money by fitting more shoes in a smaller space or using less expensive materials.
How can I make my DIY shoe cubby look professional?
To achieve a professional look:
- Take time to sand the wood thoroughly before and after assembly.
- Use wood filler to fill any gaps or holes before painting.
- Apply multiple thin coats of paint for a smoother finish.
- Add trim or molding for a more polished appearance.
Can I add doors to my shoe cubby?
Yes, you can add doors to your shoe cubby. This involves attaching hinges to the cubby frame and the doors. Measure the opening of each cubby section carefully to ensure the doors fit properly. Consider using magnetic catches to keep the doors closed.
Remember, building a shoe cubby is not only about building storage but also about learning and having fun. With the right plan and a bit of patience, you can build a functional and stylish piece for your home.
15 Free DIY Shoe Cubby Plans
Discover 15 free DIY shoe cubby plans to build shoe cubbies and organize your footwear collection efficiently. Start your project today!
1. Simple DIY Wooden Shoe Cubby
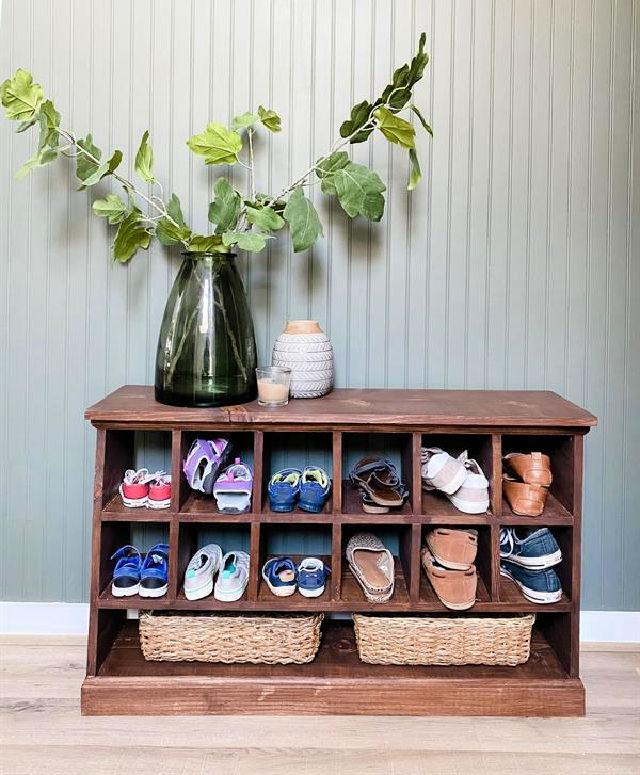
Transform your entryway or coat closet with a practical and stylish small shoe cubby from Kreg Tool. This versatile piece not only helps organize shoes, socks, and essentials but also serves as a convenient bench. With clear, step-by-step instructions, you can cut and assemble the wood components with ease.
Pocket holes and wood glue ensure a sturdy structure, while the addition of trim gives a polished look. Sanding before assembly and sealing after construction will result in a durable, attractive finish. Perfect for keeping clutter at bay, this shoe cubby is an excellent addition to any home.
2. Super Space Saving Shoe Rack Under $0
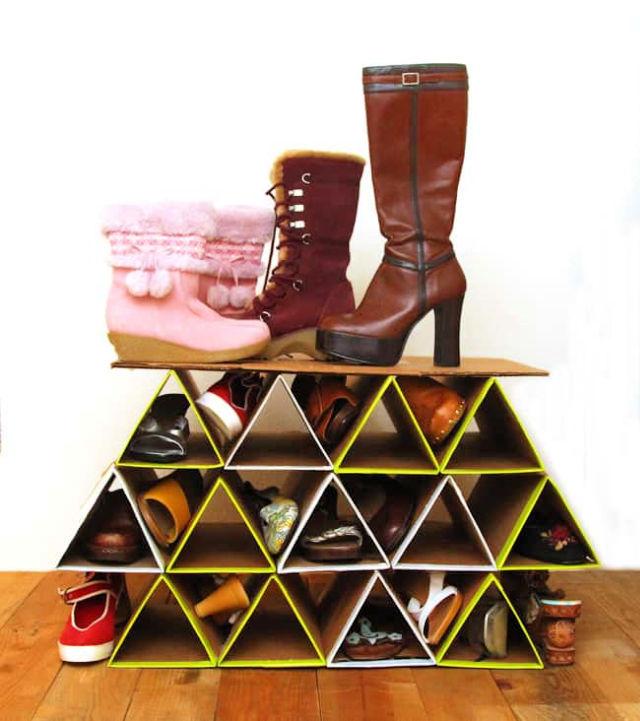
Make a clever DIY shoe rack from cardboard in just 30 minutes with the help of A Piece Of Rainbow‘s step-by-step guide. This sturdy and space-saving solution is ideal for small homes, dorms, or for those who frequently move. Learn how to repurpose cardboard into a functional closet organizer that neatly stores your shoes one behind the other, maximizing closet depth.
The process is simple: cut, score, and tape cardboard into triangular modules tailored to your shoe size. Stack these modules into rows, and voila, you have a compact, zero-cost shoe rack that can easily be recycled when it’s time to move. Get organized and give your shoes a neat home with this eco-friendly and budget-friendly project.
3. Handmade Vintage Mail Sorter Shoe Cubby
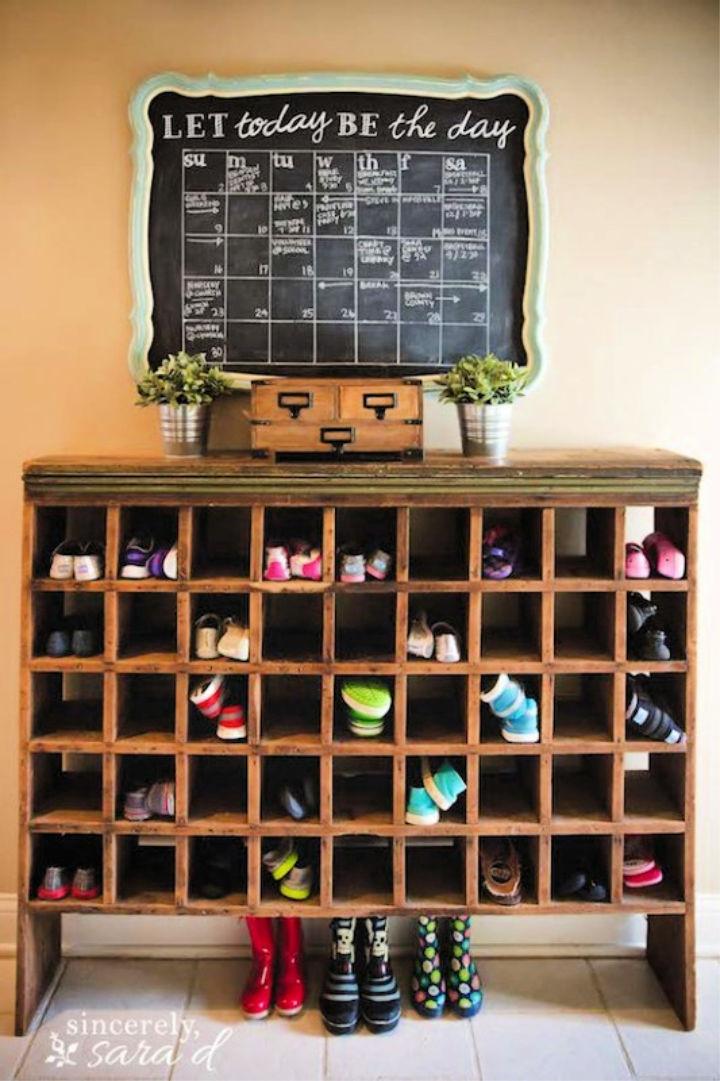
Transform your cluttered entryway into a neatly organized space with a DIY shoe cubby shelf, inspired by vintage mail sorters. Remodelaholic presents an easy-to-follow woodworking plan perfect for a weekend project, even if you’re new to crafting with wood. With this guide, you’ll build a functional and attractive shoe storage solution that fits seamlessly into narrow spaces.
Utilize simple materials like 1×10 and 1×12 boards to craft a durable piece that not only stores shoes but also enhances your home’s aesthetic. Embrace the satisfaction of building your own shoe cubby and say goodbye to messy piles of footwear. Get started on this practical and stylish addition to your home today.
4. Cheap DIY Pvc Pipe Shoe Organizer
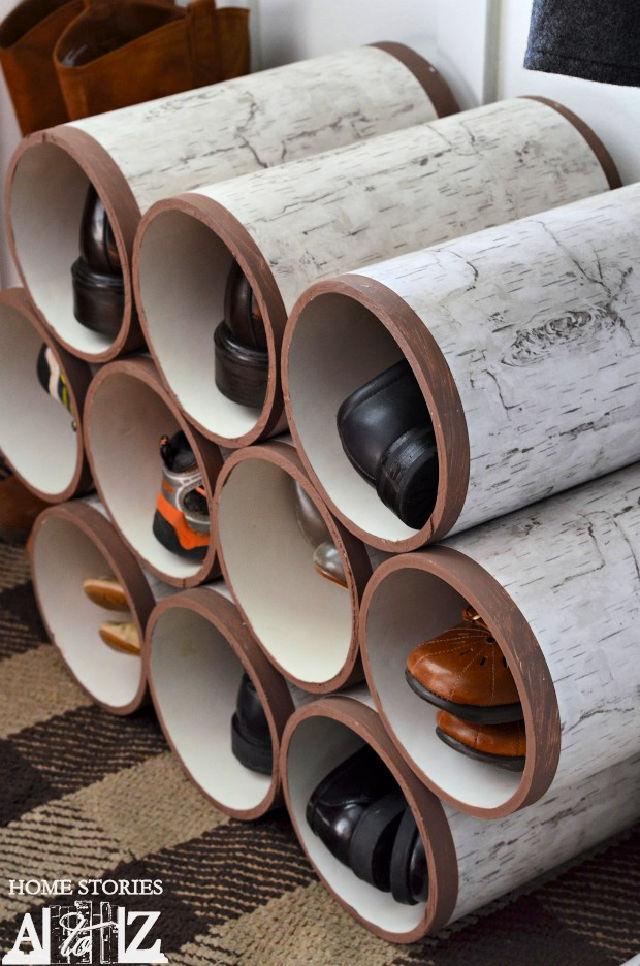
Struggling with shoe clutter at home? Home Stories A to Z offers a clever and stylish solution with their DIY PVC Pipe Shoe Organizer guide. Transform unsightly footwear chaos into an aesthetically pleasing arrangement with this easy-to-follow project.
Perfect for the mudroom or entryway, this affordable organizer is crafted from PVC pipes to mimic the look of birch logs, providing a functional and chic storage option. Learn how to cut, clean, and assemble your pipes with detailed instructions that ensure a seamless process. Embrace a tidy space and say goodbye to shoe pile-ups with this inventive organizer that’s both practical and visually appealing.
5. How to Build a Wooden Shoe Cubby
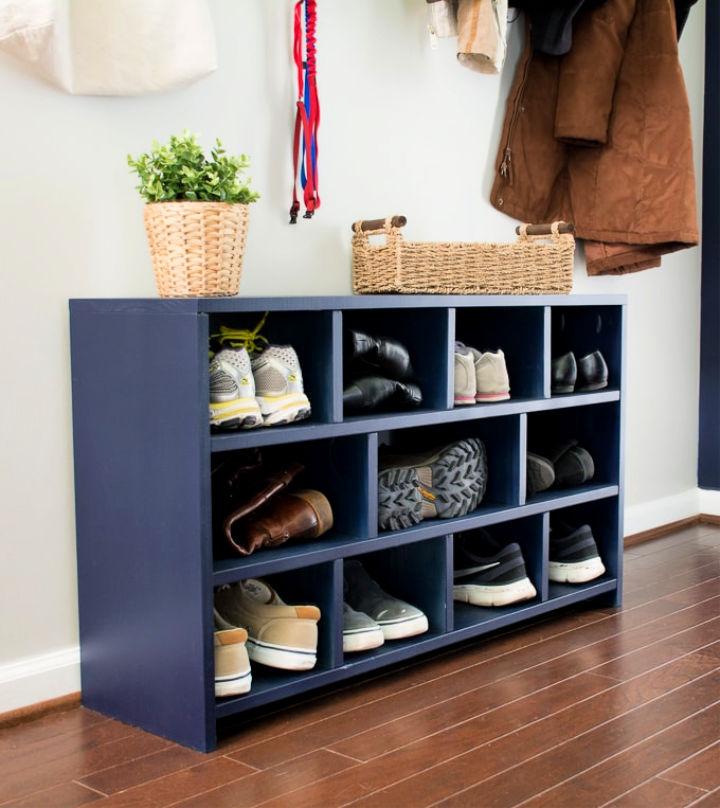
Transform your entryway with a custom-built shoe cubby using the free plans from Brittany Goldwyn | Live Creatively. Brittany Goldwyn offers a step-by-step guide to building a functional and stylish storage solution for your shoes. This project is perfect for adding organization to your home and can be tackled with ease thanks to the detailed instructions.
With a list of materials, tools, and comprehensive steps, you’ll have everything you need to make your own shoe cubby. Emphasizing functionality and aesthetics, the design is adaptable to suit any home decor. So, grab your tools, and let’s start building a shoe cubby that will keep your entryway neat and tidy.
6. Free Wood Shoe Cubbies Plan
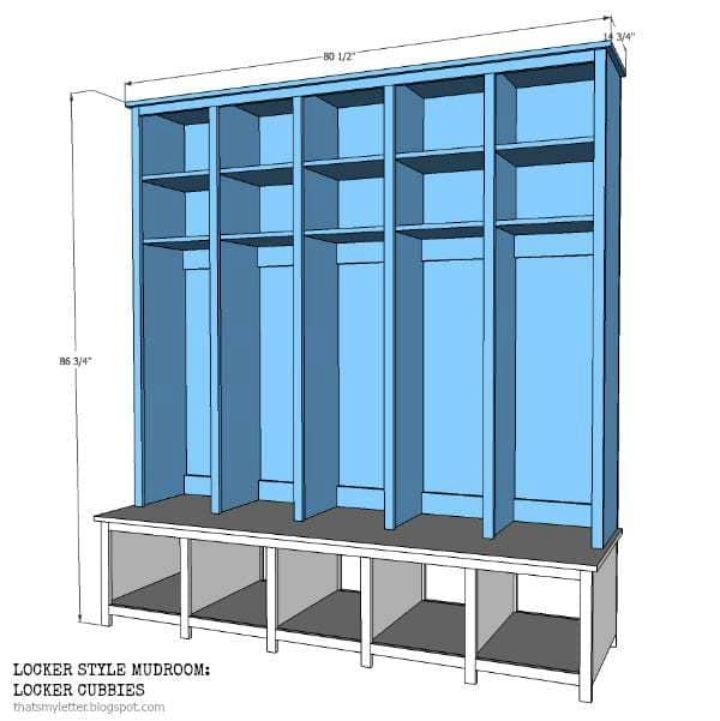
Remake your entryway into a haven of organization with the locker-style mudroom shoe cubbies detailed by Jaime Costiglio. These custom-built cubbies offer a practical solution for storing shoes, jackets, and other essentials, keeping your space clutter-free. With clear instructions and a complete cut list, Jaime’s guide ensures a straightforward building process.
Perfect for households with kids or anyone seeking a tidier home, these cubbies also double as a bench, adding functional charm to your interior. Crafted to accommodate baskets, you can personalize the dimensions to suit your needs, truly embodying the spirit of DIY. Visit Jaime Costiglio’s website for the full plans and transform your mudroom into an exemplar of tidy efficiency.
7. Build a Rolling Shoe Cubby – Step by Step
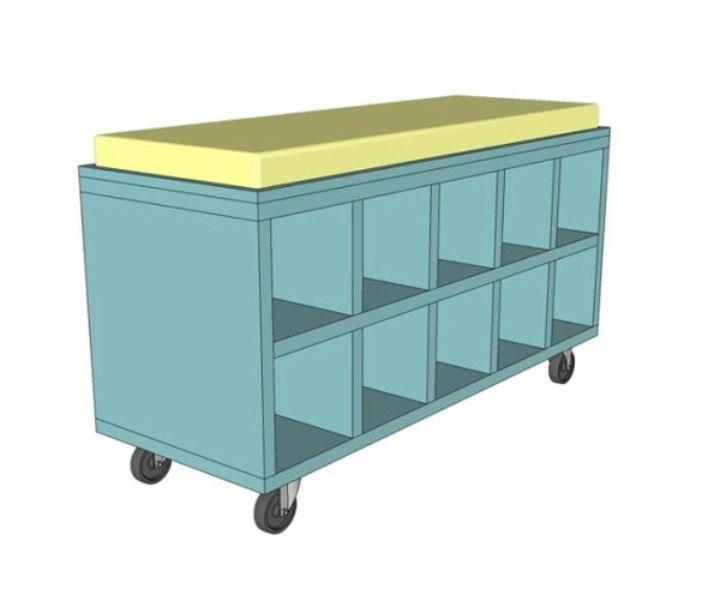
Make an organized and welcoming space with Remodelaholic‘s easy-to-follow guide on crafting a rolling shoe cubby bench. Perfect for small entryways or mudrooms, this DIY project not only helps declutter your home but also adds a touch of personalized charm.
The step-by-step instructions, complete with a materials list and cut dimensions, make assembly straightforward. Sand, drill, and assemble your way to a custom shoe storage solution that’s as functional as it is stylish. Add a pop of color and comfort with a handcrafted cushion to complete your bench. Keep your family’s footwear neatly in place and your entryway tidy with this practical and chic rolling bench.
8. Affordable DIY Closet Shoe Cubby
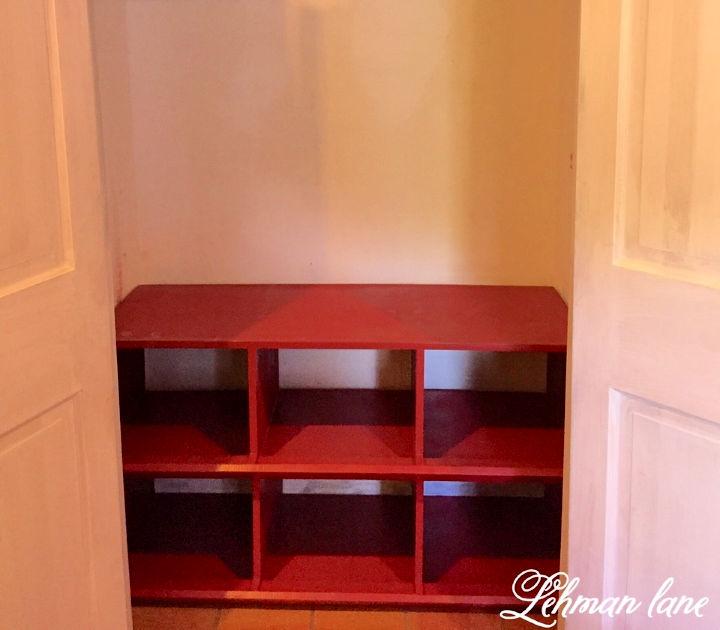
Struggling with a cluttered entryway filled with shoes? Lehman Lane offers a practical solution with their DIY closet shoe cubby guide. Step into an organized space by crafting your own shoe storage with their easy-to-follow instructions. The project is budget-friendly and customizable to fit your family’s needs, helping to keep your home tidy and shoes neatly in place.
With a clever design that includes a lip to prevent shoes from tumbling out and an access panel for maintenance, this shoe cubby not only streamlines your entryway but also adds a touch of style with its color options. Build a calming, clutter-free environment today with Lehman Lane’s helpful guide.
9. How to Make a Shoe Storage Cubby
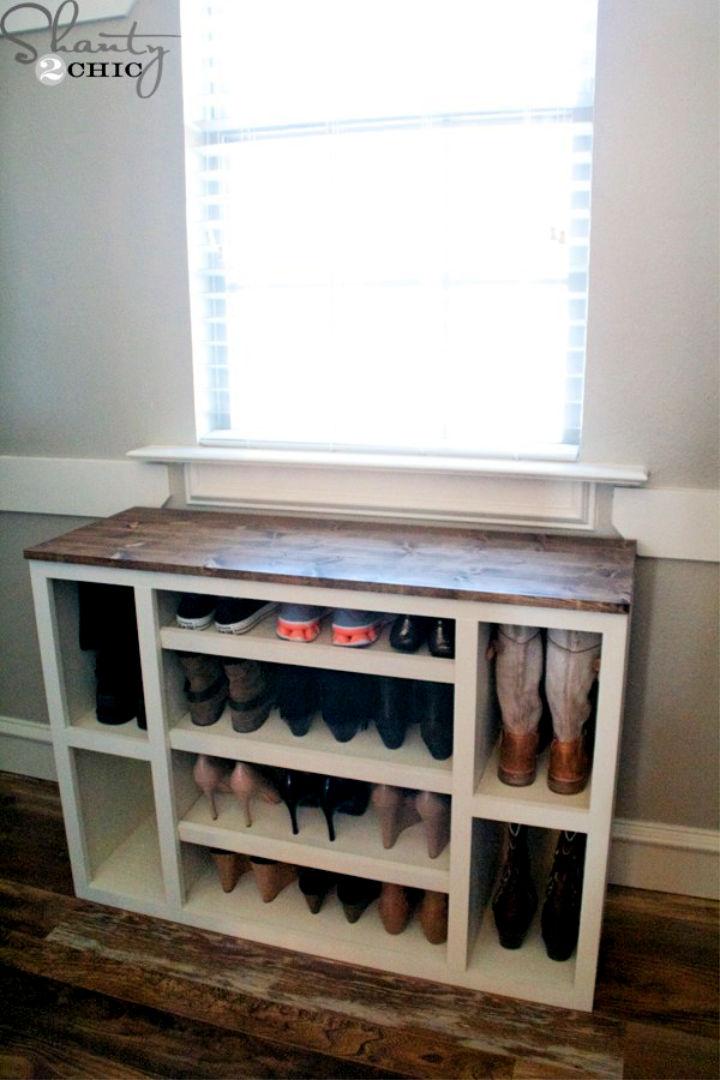
Looking to organize your footwear collection? Shanty 2 Chic‘s DIY Shoe Storage Cabinet offers a stylish and functional solution to keep your shoes neatly stored and easily accessible. Ashley Turner shares a step-by-step guide to constructing a modular closet storage system, complete with free downloadable plans. The shoe cabinet is crafted from formaldehyde-free birch plywood and can be customized with adjustable shelves for boots and shoes of different sizes.
The detailed instructions include tips for using tools like the Kreg Rip-Cut and Shelf Pin Jig, ensuring even beginners can tackle this project with confidence. With a combination of staining and painting, the finished cabinet not only provides practical storage but also enhances your closet’s aesthetic. Build one for yourself, or build multiple units for a comprehensive shoe organization system.
10. Inexpensive Homemade Shoe Cubby
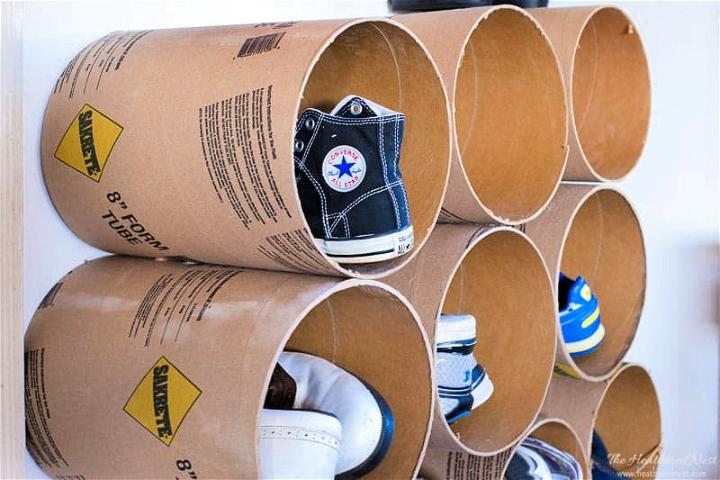
Looking to tidy up your shoe collection without breaking the bank? The Heathered Nest offers an ingenious solution with a DIY shoe cubby tutorial that transforms concrete form tubes into a sleek, space-saving storage system.
Perfect for organizing your garage or any cluttered area, this project is a breeze to complete, requiring no wood, glue, paint, or nails. Simply cut the tubes, sand the edges, and connect them with cable ties for a sturdy and practical shoe organizer. Attach it to the wall for added stability, and in just about an hour, you’ll have a functional and cost-effective way to keep your shoes neatly in one place.
11. Make Your Own Shoe Cubby
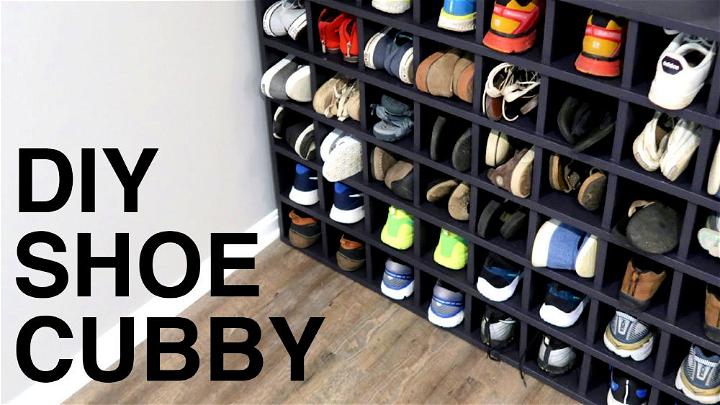
If you’re keen on organizing your footwear and giving your space a tidy look, the Easy Shoe Cubby Speed Build video on YouTube offers a practical solution. The channel, Make For Others, provides a step-by-step guide to constructing a large shoe cubby ideal for families needing ample storage.
The design’s simplicity is its strength, catering to different space dimensions with ease. Crafted from reclaimed materials, it’s an eco-friendly project that adds a touch of customization to any home. With clear visuals and a pace that’s easy to follow, viewers can confidently tackle this DIY project, enhancing their woodworking skills and building a functional piece for their mudroom or garage.
12. Easy DIY Storage Cubbies Tutorial
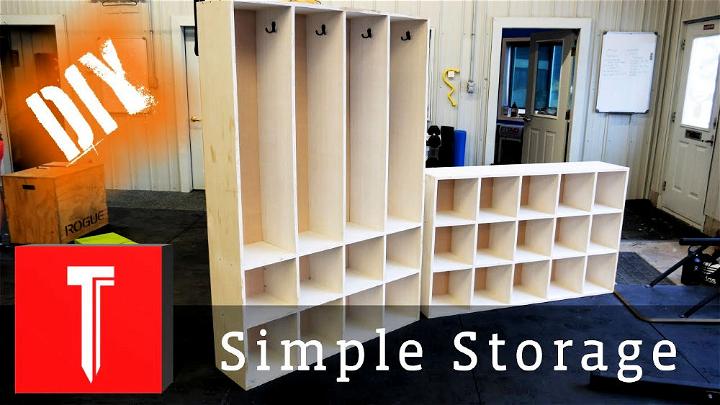
Elevate your home organization game with this DIY Cubbies project! In this engaging YouTube tutorial, the creator takes you through the process of crafting simple and cost-effective cubbies perfect for your gym, mudroom, or kids’ room.
With clear instructions and minimal supplies like plywood, glue, and screws, you can easily replicate these versatile storage solutions. The two different-sized cubbies, one measuring 4×6 feet and the other 3×5 feet, offer plenty of space to neatly store shoes, belongings, or workout gear. Transform your space into an organized haven with this DIY project, and enjoy clutter-free living without breaking the bank.
13. DIY Cubby Bench for Shoe Store
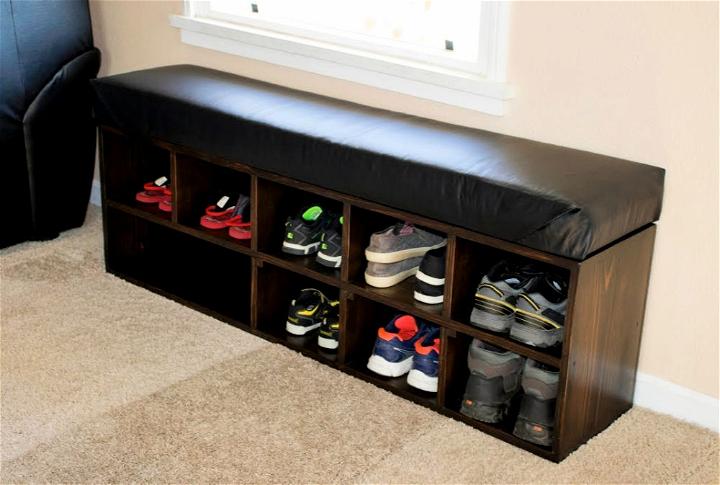
Looking to tackle clutter and enhance your entryway with a practical piece of furniture? YouTube offers a fantastic guide on crafting a DIY shoe storage bench that not only organizes your shoes but also provides a comfortable place to sit. The video takes you through the process step-by-step, making it easy to follow along, even if you’re new to woodworking.
With clear instructions and safety tips, you’ll learn to cut, assemble, and finish your bench with a sense of accomplishment. Not only will this bench tidy up your space, but it will also add a touch of handcrafted charm to your home. Visit YouTube for this engaging tutorial and get ready to transform your living space with a functional and stylish shoe storage bench.
14. How to Build a Shoe Storage Cubby
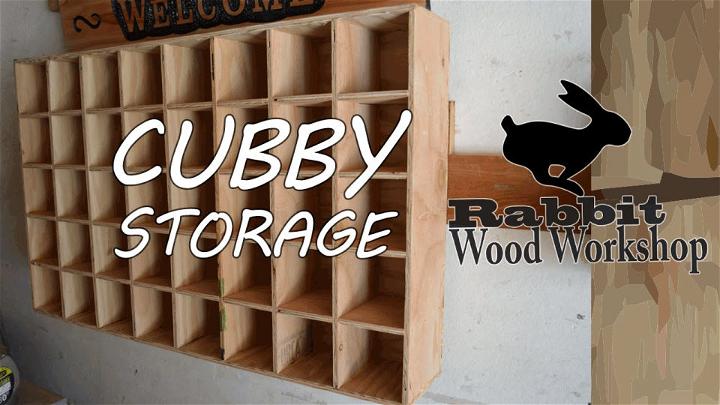
If you’re keen to build your own cubby storage, YouTube’s Rabbitwood Workshop has an easy-to-follow guide that simplifies the process. With a few pieces of wood and some basic tools, you can construct a versatile storage solution perfect for any space. The video provides step-by-step instructions, ensuring that even those new to woodworking can achieve great results.
Adjust the size to fit your needs, and learn how to utilize simple hand tools or a jigsaw for cutting. Perfect for organizing your home or workspace, this DIY project is both practical and rewarding. Get ready to build a custom cubby storage that’s tailored just for you with Rabbitwood Workshop’s helpful tutorial.
15. Free Shoe Cubby Woodworking Plan
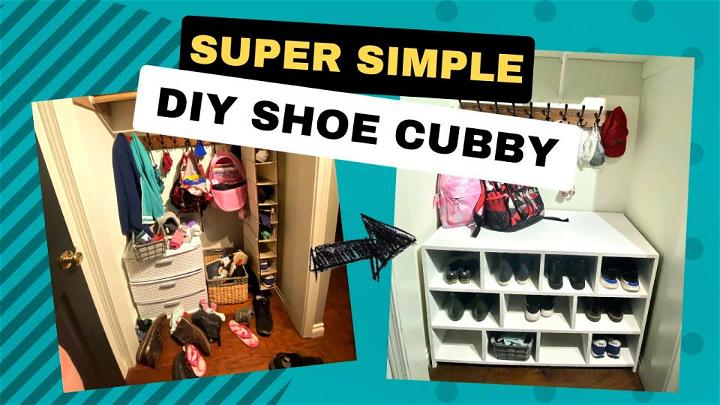
Make a functional and organized entryway with our Super Simple DIY Shoe Cubby project! Tired of the shoe clutter at your doorstep? This easy-to-follow guide will help you build a custom shoe cubby to keep things tidy. All you need are some basic tools, plywood, and a Kreg Jig.
Follow our step-by-step instructions to cut, assemble, and paint your shoe cubby. It’s a great solution for kids’ shoes, backpacks, and more. Say goodbye to entryway chaos and hello to a neater, happier home! Watch the full tutorial on YouTube and transform your entryway today.
Conclusion:
In conclusion, our guide on 15 free DIY shoe cubby plans provides you with all the necessary steps, materials, and inspiration to tackle this rewarding project. By building your own shoe storage solution, you have the freedom to customize it to fit your space and style perfectly. Whether you’re aiming to de-clutter your entryway or add a bespoke touch to your closet, these DIY cubby plans are designed to guide you through the process effortlessly. Thank you for taking the time to explore how to enhance your home with a handmade shoe cubby.
